
For the purposes of the tutorial, you will need to be able to connect to a database and create a table called TUTORIAL. The tutorial assumes that you can connect to a database called $DATABASEURL as user $USERNAME, password $PASSWORD, which uses a JDBC driver $JDBCDRIVERCLASSNAME.
An example of the values for an Oracle database instance is: $DATABASEURL=jdbc:oracle:thin:@localhost:1521:TESTDB, $USERNAME=TEST, $PASSWORD=TEST, $JDBCDRIVERCLASSNAME=oracle.jdbc.OracleDriver.
CREATE TABLE "TUTORIAL" ("CAT" VARCHAR2(10), "VAL" NUMBER);

INSERT INTO "TUTORIAL" ( "CAT", "VAL" ) VALUES ( 'apples', 10 );

INSERT INTO "TUTORIAL" ( "CAT", "VAL" ) VALUES ( 'oranges', 15 );

INSERT INTO "TUTORIAL" ( "CAT", "VAL" ) VALUES ( 'bananas', 5 );

COMMIT;
An example of the values for a MySQL database instance is: $DATABASEURL=jdbc:mysql://localhost:3306/TESTDB, $USERNAME=TEST, $PASSWORD=TEST, $JDBCDRIVERCLASSNAME=com.mysql.jdbc.Driver.
CREATE TABLE TUTORIAL ( CAT VARCHAR(10), VAL NUMERIC);

INSERT INTO TUTORIAL ( CAT, VAL ) VALUES ( 'apples', 10 );

INSERT INTO TUTORIAL ( CAT, VAL ) VALUES ( 'oranges', 15 );

INSERT INTO TUTORIAL ( CAT, VAL ) VALUES ( 'bananas', 5 );

COMMIT;
The table represents data which will be read into a pie chart. The row format required for pie charts is Comparable-'category', Number-'value'. Consult the schema documentation of 'queryTypeEnum' to see the row formats for other chart types.
Lets assume that you unpacked the webcockpit distribution into a directory, say $webcockpit.
Create a directory 'tutorial' in the $webcockpit directory. This should be alongside the distribution's 'examples' directory. Make 3 directories, called 'config', 'template' and 'external' within the 'tutorial' directory.
The $webcockpit directory structure should look like:
README.txt                       - the project readme file
NOTICE.txt                       - acknowledgements of other Open Source projects used
LICENSE-webcockpit.txt           - the license conditions
/tutorial                        - directory created for the tutorial
    /config                      - where to place the tutorial configuration file
    /external                    - where to place external files for the tutorial
    /template                    - where to place HTML template files for the tutorial
/examples                        - examples bundled with the distribution
/input                           - all files required by Webcockpit based Web Applications at runtime
/lib                             - required libraries to run Webcockpit builder
Take the following XML and copy it into a file called 'build.xml' in the tutorial directory.
<?xml version="1.0"?>
<project name="webcockpit.tutorial" default="build" basedir=".">
	<!-- build -->
	<target name="build">
		<property name="buildbasedir" value="${basedir}/.."/>
		<property name="build.lib" value="${buildbasedir}/lib"/>
		<property name="build.input" value="${buildbasedir}/input"/>
		<property name="config" value="${basedir}/config"/>
		<property name="output" value="${basedir}/output"/>
		<property name="template" value="${basedir}/template"/>
		<property name="external" value="${basedir}/external"/>
		<taskdef name="webcockpitgen" classname="org.webcockpit.builder.Generator" classpath="${build.lib}/webcockpitgen.jar">
			<classpath>
				<fileset dir="${build.lib}">
					<include name="**/*.jar"/>
					<include name="**/*.zip"/>
				</fileset>
			</classpath>
		</taskdef>
		<mkdir dir="${output}"/>
		<delete>
			<fileset dir="${output}"/>
		</delete>
		<copy todir="${output}">
			<fileset dir="${build.input}"/>
		</copy>
		<webcockpitgen configDir="${config}" templateDir="${template}" outputDir="${output}"/>
		<mkdir dir="${external}"/>
		<copy todir="${output}">
			<fileset dir="${external}"/>
		</copy>
		<delete file="${basedir}/webcockpittutorial.war"/>
		<zip basedir="${output}" destfile="${basedir}/webcockpittutorial.war" duplicate="fail"/>
	</target>
</project>
This ant build file will construct a deployable WAR file when calling the 'build' target. The build process will not work until you provide a valid configuration file and optionally your own HTML templates for the finished web application. We will do this in the tutorial steps. Call 'ant build' and make sure the build fails with something like:
[webcockpitgen] java.io.FileNotFoundException: $webcockpit\tutorial\config\config.xml
We require a webcockpit configuration file before the build process can generate a complete web application. For this purpose copy the following XML into the $webcockpit/tutorial/config/config.xml file.
<?xml version="1.0" encoding="UTF-8"?>
<webcockpit xmlns:xsi="http://www.w3.org/2001/XMLSchema-instance"
            xsi:noNamespaceSchemaLocation="..\..\input\etc\webcockpit.xsd">
	<context path="/webcockpittutorial" displayname="WebCockpit - Tutorial">
		<datasource id="dbConTutorial" description="This is the JNDI datasource used in the tutorial">
			<parameter name="driverClassName" value="$JDBCDRIVERCLASSNAME"/>
			<parameter name="url" value="$DATABASEURL"/>
			<parameter name="username" value="$USERNAME"/>
			<parameter name="password" value="$PASSWORD"/>
			<parameter name="maxActive" value="1"/>
			<parameter name="maxWait" value="-1"/>
			<parameter name="maxIdle" value="1"/>
		</datasource>
	</context>
</webcockpit>
The context path represents the part of the web application URL. Once deployed to Tomcat, the tutorial will be callable under:
http://hostname:portnum/webcockpittutorial
The configuration file contains a reference to the distribution's XML Schema. You can use this schema to validate your configuration files.
The tutorial assumes that you are using MySQL as a database. Depending on your availible database, you will have to modify the driverClassname property and the other connection parameters. Consult Tomcat's User Guide to JNDI Resources and JDBC Datasources for more information. You should tune the datasource properties according to your needs for the web application.
The configuration file is not valid until at least one query and page are defined. This is the subject of the next step.
Add the following XML elements to the configuration file started in step3, after the context element.
	<query id="pieQuery" type="pie">
		<sql>select cat "category", val "value" from tutorial</sql>
	</query>
	<page id="piePage">
		<item id="pieChart" queryid="pieQuery">
			<chart type="pie3d">
				<img width="300" height="300"/>
			</chart>
		</item>
	</page>
This configures a pie chart and define's it's associated query. A single query can be used by multiple charts or tables, this is why the query is defined as a separate element, and not as a child element of the chart itself. Webcockpit checks that the link between the chart and query ( via the charts queryid ) matches to an existing queries id attribute.
The only mandatory attributes of the chart are it's width and height.
A page can contain multiple items, each of which can be a chart and/or table. The page attribute id is used as the page name in the final web application. Once the web application is deployed and running, the chart will be accessible under http://hostname:portnum/webcockpittutorial/piePage.jsp
Go to $webcockpit/tutorial directory and execute 'ant' at a command prompt.
		[webcockpitgen] template file for page piePage does not exist [$webcockpit\tutorial\template\default.html].
		[zip] Building zip: D:\dev\progs\webcockpit-1.1.0\tutorial\webcockpittutorial.war
You can inspect the contents of the webcockpittutorial.war file before deploying to Tomcat. The entire contents of the output directory are simply zipped up into the .war file. The context.xml file which is used by Tomcat during deployment is found under the META-INF directory. The context.xml contains the application path and the JNDI datasource configuration data for the application.
The easiest manual way to deploy the WAR file is to use Tomcat's web application manager.
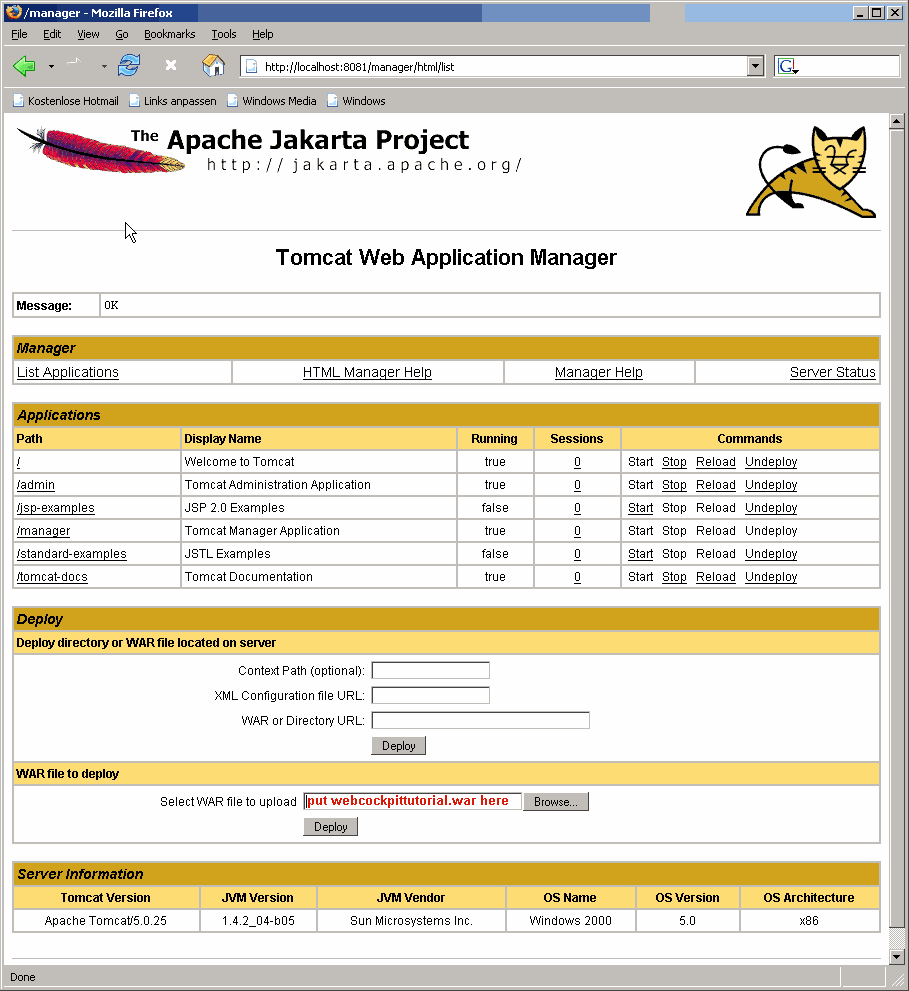
Clicking on 'deploy' will deploy the tutorial and the '/webcockpittutorial' will become visible as a web application. Click on the link to the web application and you should see.
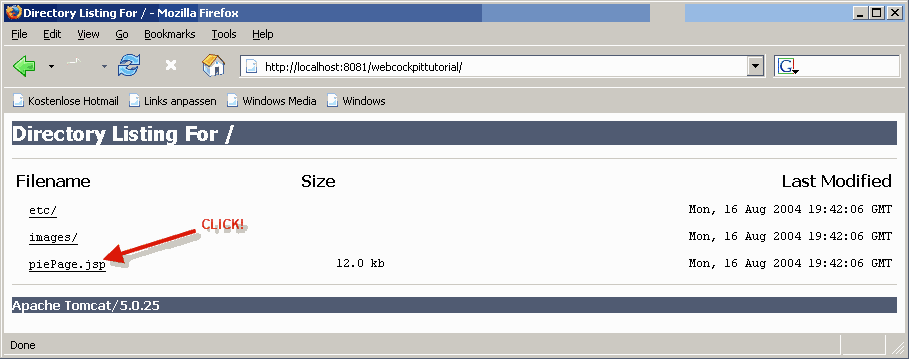
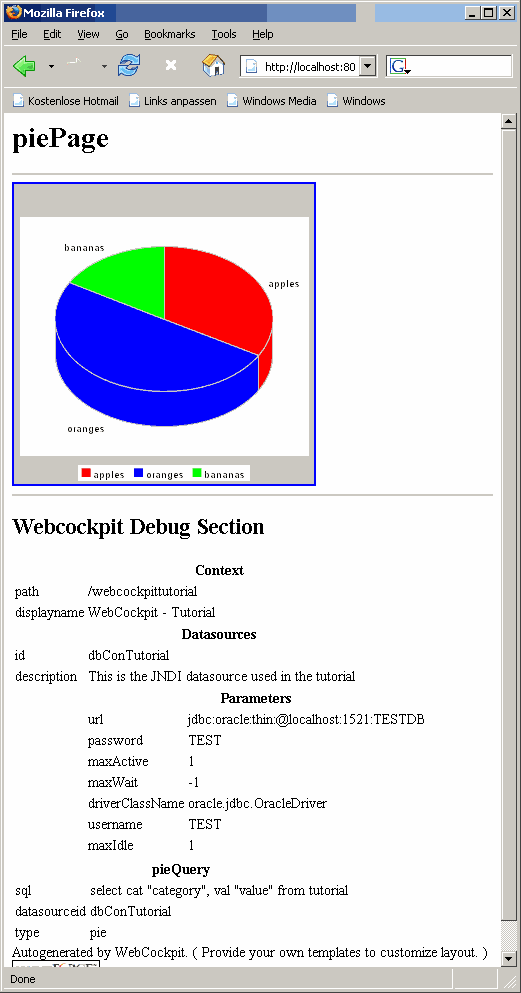
Clicking on piePage.jsp will cause Tomcat to compile the JSP page into a Java class file which 'serves' the request for the page. This should provide the following output ( the first page hit takes a long time due to the compilation of the JSP ).
Webcockpit uses displaytag taglib for displaying tables. Webcockpit allows you to configure almost every displaytag possibility. From exporting table data, to sorting by columns on page or list, pagination, html markup, decorators etc.
The tutorial doesn't exactly do much currently by showing the pie chart. Before we go in the direction of customizing the HTML layout and templates, let's extend the tutorial with a second page containing a table representation of the pie chart contents, and link the pie chart and the table together.
Each time we change the configuration file now, we can cycle through the build, deploy and run process described in the previous steps. A running web application can be undeployed through the Tomcat web application manager just by clicking on 'Undeploy'.
Add the following page element to the configuration file below the piePage element.
	<page id="tablePage">
		<item id="pieTable" queryid="pieQuery">
			<table maxrows="1000" showheadings="true">
				<column alias="value">
				</column>
				<column alias="category">
				</column>
			</table>
		</item>
	</page>
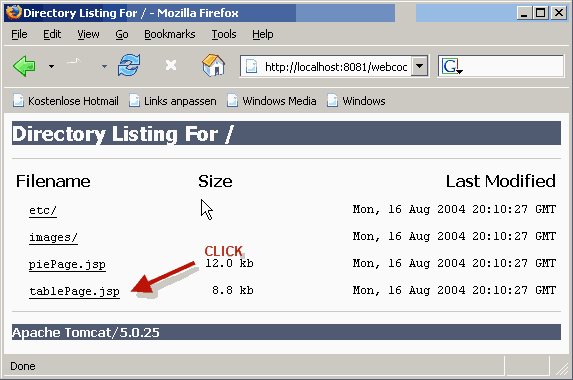
The resulting table page should look like:

To illustrate linking between page items, replace the piePage and tablePage XML segments with the ones provided below. This effectively adds a 'link' element to the pie chart and two 'link' elements to the table.
	<page id="piePage">
		<item id="pieChart" queryid="pieQuery">
			<chart type="pie3d">
				<img width="300" height="300"/>
				<link refpageid="tablePage"/>
			</chart>
		</item>
	</page>
	<page id="tablePage">
		<item id="pieTable" queryid="pieQuery">
			<table maxrows="1000" showheadings="true">
				<column alias="value">
					<link  refpageid="piePage"/>
				</column>
				<column alias="category">
					<link  refpage="http://webcockpit.sourceforge.net"/>
				</column>
			</table>
		</item>
	</page>
Redeploying and running the application will show that the chart has a link to the table. The table column 'value' has a link to the pie chart. Additionally the 'category' column links to an external web page. External links are indicated by the 'refpage' attribute. Internal links to other webcockpit pages are indicated by the 'refpageid' attribute.
Look at the other examples provided for more options for linking. It is possible to pass result set values with the 'bind' elements to other pages. The values are passed using page request parameters. It is possible to 'forward' page request parameters used in the current page to a target page.
You must provide templates in order to customize the look and feel of the final web application. Webcockpit declares some XML / HTML comments which are replaced with JSP code sections at build time. The template to use for a page is configured in a page element's 'template' attribute. The template is a filename which will be looked up in the template directory.
Change the configuration file to include the tempates for both pages.
	<page id="piePage" template="pieTemplate.txt">
		<item id="pieChart" queryid="pieQuery">
			<chart type="pie3d">
				<img width="300" height="300"/>
				<link refpageid="tablePage"/>
			</chart>
		</item>
	</page>
	<page id="tablePage" template="tableTemplate.txt">
		<item id="pieTable" queryid="pieQuery">
			<table maxrows="1000" showheadings="true">
				<column alias="value">
					<link  refpageid="piePage"/>
				</column>
				<column alias="category">
					<link  refpage="http://webcockpit.sourceforge.net"/>
				</column>
			</table>
		</item>
	</page>
Add the following text as a file called 'pieTemplate.txt' in the template folder.
<!-- WebCockpit pagetags -->
<!-- WebCockpit taglibtags -->
<!-- WebCockpit webcockpitsection -->
<!-- WebCockpit querysection -->
<!-- WebCockpit itemsection -->
<html>
<head>
</head>
<body>
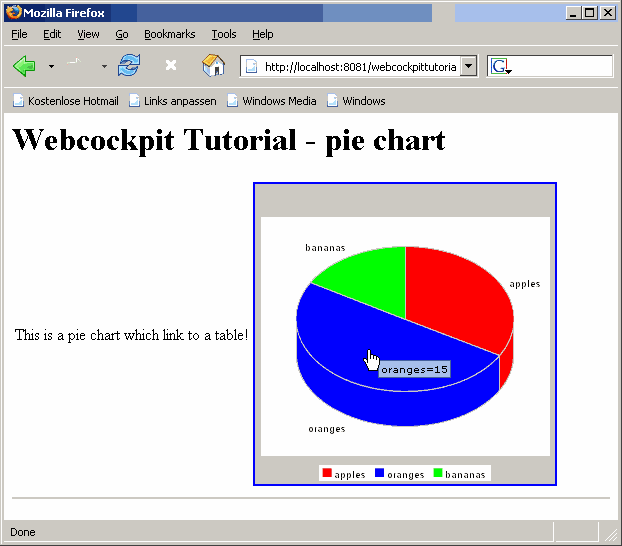
<h1>Webcockpit Tutorial - pie chart</h1>
<table>
<tr>
	<td>
		This is a pie chart which link to a table!
	</td>
	<td>
		<!-- WebCockpit chartsection-pieChart -->
	</td>
</tr>
</table>
<hr/>
</body>
</html>
Add the following text as a file called 'tableTemplate.txt' in the template folder
<!-- WebCockpit pagetags -->
<!-- WebCockpit taglibtags -->
<!-- WebCockpit webcockpitsection -->
<!-- WebCockpit querysection -->
<!-- WebCockpit itemsection -->
<html>
<head>
</head>
<body>
<h1>Webcockpit Tutorial - pie table</h1>
<table>
<tr>
	<td>
		This is a table representation of a result set, linking back to the pie chart.
	</td>
	<td>
		<!-- WebCockpit tablesection-pieTable -->
	</td>
</tr>
</table>
<hr/>
</body>
</html>
Rebuild and deploy the application. The resulting pictures show the final look and feel.

A key to 'success' with Webcockpit is understanding the configuration file. The examples are intended to give a broad feeling for what is possible using webcockpit. Furthermore, refer to the Schema for more information on the schema. Advanced users will eventually have to understand how the configuration file is translated into JSP code. You can mix your own JSP code with that of webcockpit JSP to provide truly dynamic web applications. For instance, you can add your own code to analyze the SQL result set, and change some chart or HTML properties depending on the result set data. Such a feature could be used to control alarm or warning levels and monitor service level agreements.